LinkedIn for Beginners| 9 Tips to Upgrade Your LinkedIn Profile
By Melanie Sampson, M Resumes and Career Consulting | Washington, D.C.
Sometimes you can identify your next opportunity just by networking. With millions of active users, LinkedIn is a great platform for professionals looking for their next opportunity. This article will help you set-up your LinkedIn profile so you can begin your networking journey.
Follow these steps to create an engaging and professional LinkedIn profile:
- Step 1: Add a professional photo of yourself
- Step 2: Update your industry and location
- Step 3: Personalize your LinkedIn URL
- Step 4: Add a summary
- Step 5: Detail your experience
- Step 6: Include at least 5 skills
- Step 7: Add your education
- Step 8: Make at least 50 professional connections
- Step 9: Enable the “Let recruiters know you’re open” feature
The following is a step-by-step approach that discusses techniques and rationale while answering some of the most often asked questions during LinkedIn workshops.
Step 1: Add a professional photo of yourself.
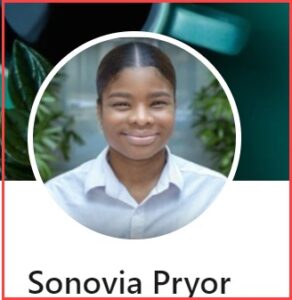
A professional photo is what influences the first impression of you and can greatly increase your profile views. Sometimes a picture can say a lot more about you than your words. Hiring a professional photographer is highly recommended, however, if you must do it yourself, make sure you have the best lighting possible. Additionally, remember to consider your target audience and the brand you are promoting. For example, an entrepreneur may work with a diverse range of customers, so their photo may be more business casual to convey approachability, while a corporate lawyer would take a studio photo and dress in a business suit.
Step 2: Update your industry and location.
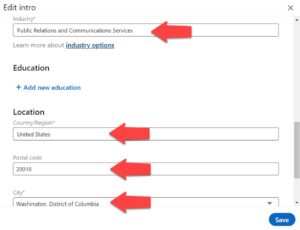
It is critical to identify your industry and location because they are two of the most essential criteria used by recruiters. When performing a key-word search, LinkedIn prioritizes location as one of the top five fields. The five fields are as follows: Name, Headline, Location, Summary, and Experience.
Select your industry and type in your location as shown below.
Step 3: Personalize your LinkedIn URL
Every LinkedIn user has a URL, or unique internet address associated with their account. This URL is what allows browsers to specifically locate you in a search of millions of LinkedIn users. The URL is automatically generated when an account is created, using your first and last name, followed by digits, letters, and dashes before you personalize.
Example: www.linkedin.com/in/sonovia-pryor-a77a671b8.
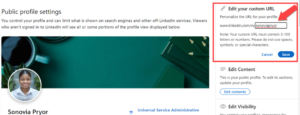
Take a look at the URL below. You will notice that I do not use any dashes, digits, or characters: www.linkedin.com/in/sonoviapryor. I advise all my clients to personalize their URL and then display it on materials such as their email signature, business cards, and resumes.
To customize your URL, in the upper right corner, click “Edit your public profile”. From here you can update your URL. I strongly recommend using your first and last name if it is available.
NOTE: Linked in will not allow you save your new URL if it is already being utilized by another user.
Be mindful that LinkedIn is a site for professionals. It is best to avoid informal personalization (…/sonoviapryor4444). If your first and last name are not available, choose from one of the following modifications:
- Middle initial (…/sonovianpryor)
- Educational designation (…/sonoviapryormmd) – if I graduated medical school.
- Professional designation (…/sonoviapryorpesq) – if I was a lawyer.
- Country designation (…/sonoviapryorusa)
Step 4: Add a Summary
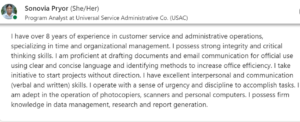
There is an option to compose a summary about yourself right below your name, photo, location, business, and education. This is the perfect opportunity to promote your business and incorporate key words. I advise my clients to begin by utilizing the profile statement from their resume. A simple copy and paste will give you the foundation to build a strong LinkedIn summary. For example, the profile summary on a resume would read something like:
Over 8 years of experience in customer service and administrative operations, specializing in time and organizational management. Possesses strong integrity and critical thinking skills. Proficient at drafting documents and email communication for official use using clear and concise language and identifying methods to increase office efficiency. Takes initiative to start projects without direction. Excellent interpersonal and communication (verbal and written) skills. Operates with a sense of urgency and discipline to accomplish task. Adept in the operation of photocopiers, scanners, and personal computers. Firm knowledge in data management, research, and report generation.
While 3rd person is standard for resumes, for your LinkedIn profile, you want to change the wording in you profile summary from 3rd person to 1st person:
I have over 8 years of experience in customer service and administrative operations, specializing in time and organizational management. I possess strong integrity and critical thinking skills. I am proficient at drafting documents and email communication for official use using clear and concise language and identifying methods to increase office efficiency. I take initiative to start projects without direction. I have excellent interpersonal and communication (verbal and written) skills. I operate with a sense of urgency and discipline to accomplish tasks. I am adept in the operation of photocopiers, scanners, and personal computers. I possess firm knowledge in data management, research, and report generation.
There is a 2000-character limit (including blank spaces) in the Summary section, so feel free to be creative.
Step 5: Detail your Experience.
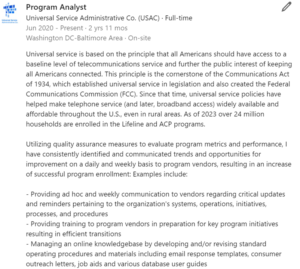
Initially, the advice for finishing the experience section was to provide high-level descriptions of your present and previous employment. This made sense to me until I discovered studies on “keyword density,” which is the number of times your keywords appear in your profile. For example, if the term “lawyer” appears three times in your profile and 37 times in mine, I will rank considerably higher in a search for a lawyer. Majority of my clientele seem to dislike this, as it comes off generic. Of course, we want to be scouted for our talents and expertise when searching for a job, not for things like keyword repetition. But the reality is there are three barriers job seekers must get passed when applying for positions that have been advertised online:
- Automated Systems: Because computers are incapable of distinguishing between the intricacies of texts, they just hunt for and count keywords. I have had clients ask me what a keyword is, so I will clarify what I mean. A keyword is any word that describes an expertise or knowledge. The simplest technique to choose which key words to utilize is to first review your resume and underline all the essential descriptive terms. Then, on LinkedIn, examine the important terms your peers use across their profiles, particularly in the skills area (refer to step 7 below). The third and last action is to scan at least 5 job listings for terms that you are interested in. Utilizing the three techniques outlined above, you should be able to quickly identify a minimum of 20 key terms to concentrate on.
- Being chosen by a recruiter or hiring manager for an interview: Recruiters sometimes review hundreds and thousands, of potential applicants to identify a few top prospects, so make sure your writing is engaging. They want to know everything there is to know about you and what you are capable of. To satisfy recruiters, you must address three areas: background, actions, and outcomes. Preferably, your experience section should begin with the background, or what your organization does. What size is your organization? What is the main purpose of your role in the organization? What challenges did you face? What objectives did you aim for? Actions should describe what exactly what you did to contribute. It is critical that you express your individual contribution if you worked as part of a team. Most individuals explain their experiences exclusively in terms of actions, which makes for tedious reading. The final thing you may do to liven things up is to mention your achievements. This can be difficult in some positions and is something that should be addressed on an individual basis. In principle, the more difficult it is to describe the results for your role, the less people will do it and, increasing the upper hand you have over your competitors.
- Persuade the hiring manager that you are worth meeting: While hiring managers are often only provided with a few top prospects, many of them desire a considerable amount of detail on both technical and practical skills. If you pass all these obstacles, you will be invited to an interview.
Step 6: Include at least 5 skills.
LinkedIn allows you to list up to 50 skills, and I highly recommend you list the maximum. The more skills you include, the greater your chances of being identified as a top fit for various professions. The most obvious place to begin is with your keywords. Several of them should describe key skills you possess. It is critical to evaluate how various organizations define your skills. For example, if one company labels one of your skills “public relations” and another “marketing,” include both. It can be difficult to determine what search words a recruiter would prefer, so be sure you cover all your bases. Other people may suggest skills for you that you have not yet added, so there may be occasions when you want to add, delete or at the very least rearrange them.
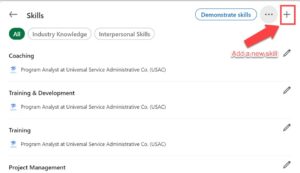
To add a new skill, click the “+” option in the upper right-hand corner of the Skill section.
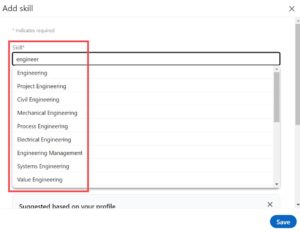
When adding a skill, I suggest selecting skills from the drop-down box that displays as you begin typing in the skill you want to add. For example, in the image below, I begin typing “Engineer,” and you can see how a variety of skills including the term “Engineer” emerge. This just indicates that other people have previously used these terms to represent their talents, or that recruiters have done searches using these terms.
Of course, you can still add an entirely new skill. For example, I can create a new skill called “training upward” to demonstrate that I sometimes must develop and present trainings to higher-ups within the organization.
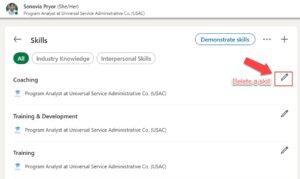
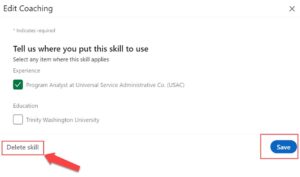
To delete a skill, click on the pencil icon next to the skill, then click “delete skill” at the bottom of the pop-up window.
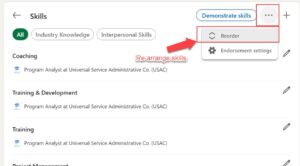
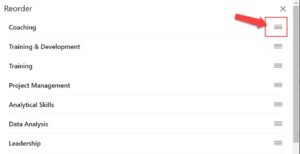
To rearrange, or edit your skills section in general, click the three dots (…) to the left of the “+” sign, then click “Reorder”. Next click and hold on the four horizontal lines then drag the skill up or down to the place you prefer.
Step 7: Add Your Education
This process is simple. Here are some pointers:
- Once you begin to type the name of your university, select it from the drop-down option to make sure the school logo appears next to it. Logos provide credibility and aesthetic appeal. This advice also applies to your experience section if your present or former employers have a corporate LinkedIn profile.
- Make a list of your specialties that will assist you with highlighting (repeating) your keywords.

Step 8: Make at Least 50 Professional Connections
LinkedIn will show your exact connection count up to 500.

Here are some tips to begin building your connections:
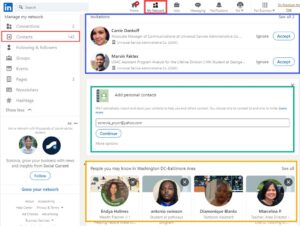
- Near the top of the page click on “My Network” as shown in red below.
- If you have Gmail, Yahoo! Mail, or Hotmail email accounts, you may allow LinkedIn to connect with your address book by choosing “continue,” as seen in green below. LinkedIn will search your directory for email addresses of users with active LinkedIn profiles. I recommend going through each one and un-selecting the persons with whom you do not wish to connect. By default, everyone is invited. LinkedIn will also notify you of who in your directory not yet have a profile. Invite everyone you believe might benefit from being on LinkedIn.
- As seen in the red box below, you can accept invites from individuals who want to connect with you.
- You may also expand your network by scrolling through the “People you may know” area, as shown in orange below, to refresh your memory and locate individuals you know.
- Other social networks (such as Facebook) can also assist with reminding you of who you know.
 Step 9: Enable the “Let recruiters know you’re open” feature.
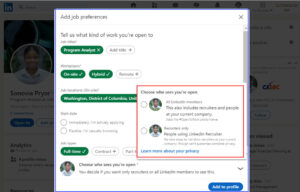
If you are making improvements to your LinkedIn profile because you are looking for job, you should notify potential employers. There are several methods of doing this that should be avoided, such as adding “Currently searching for new opportunities” in your headline or other areas of your profile that are not designed for this purpose. The most efficient way to do this is to tap your profile picture > View Profile. Tap the “Open to” button in your introduction card (at the top of your profile). Provide the requested information in the screen that appears. You can choose whether all LinkedIn members or only recruiters can see that you are open to job opportunities.
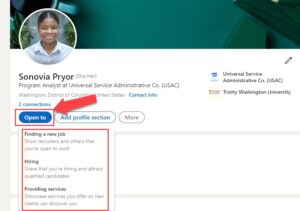
Next click “Let recruiters know you’re available,” and define where you are in your search, when you would want to start, titles you are seeking, geographic regions, type of job, firm size, and so on from the pop-up window.
